Troop transport
Your transport aircraft can carry infantry teams into a fight and pull them back out again. Troops are never spawned as DCS units inside your cabin — they are held "on board" in memory until you set them down, so loading and unloading is instant and weightless to fly but still counts against your capacity.
Everything happens through F10 → CTLD → Troop Commands. The menu is context-sensitive: entries appear based on whether you are on the ground or airborne, and whether you are sitting inside a relevant zone. It is rebuilt automatically every time you land or take off, and immediately after each load or drop.
The transport cycle
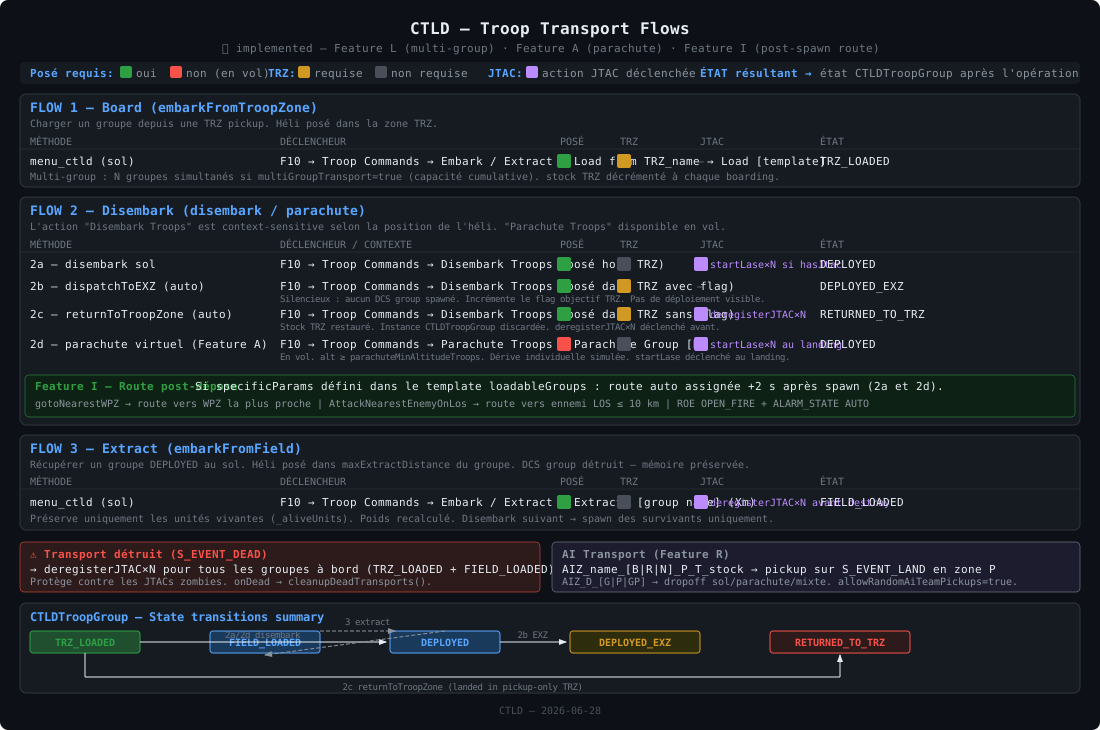
A typical sortie runs through these steps. Each one moves the group into a new state:
- Load from a pickup zone — land inside a troop zone (
TRZ_) and pick up a team. → the group is nowTRZ_LOADED(on board). - Disembark — set them down at the objective. →
deployedon the ground as a live group. - If you disembark inside an extract zone (
EXZ_), it is a silent objective drop instead: the zone's counter is incremented and no group is spawned. →DEPLOYED_EXZ. - Extract from the field — land next to a group you (or another pilot) dropped earlier and
pick it back up. →
FIELD_LOADED(on board again). - Disembark again at a new spot — repeat steps 3–4 as often as you need.
- Return to a pickup zone — land inside a
TRZ_while carrying troops to hand them back; the zone's stock is restored. →RETURNED_TO_TRZ.
Where the pickup zones, extract zones and loadable teams come from is set up by the mission maker — see Zone setup and Configuration.
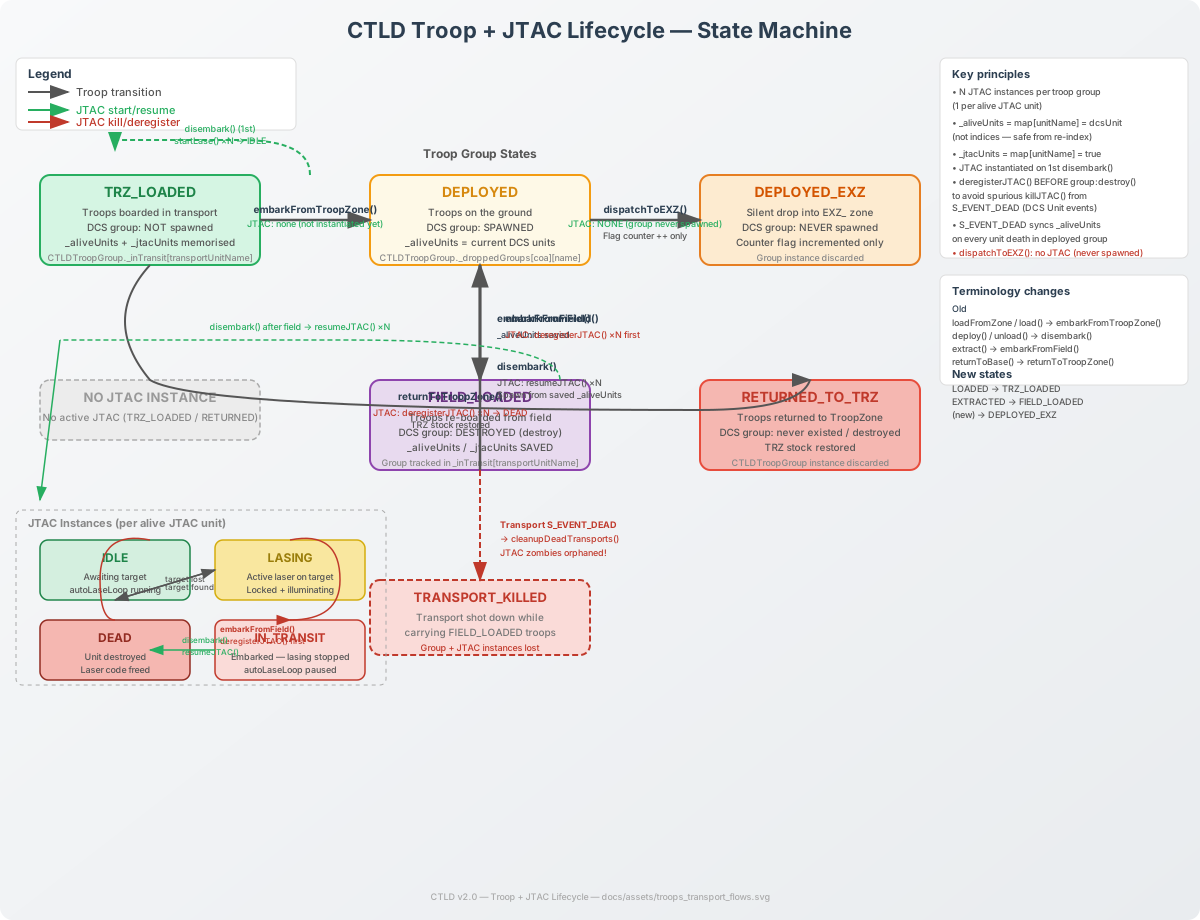
Both flows are drawn out in the reference diagrams: troop transport flows and troop + JTAC lifecycle.
The F10 menu
CTLD
  └── Troop Commands
        ├── Disembark Troops                    ← on the ground, when carrying troops
        │   or Disembark Troops (submenu)       ← if 2+ groups on board:
        │       ├── Disembark All
        │       ├── [1] <group name>
        │       └── [2] <group name>
        ├── Embark / Extract Troops             ← on the ground
        │     ├── Load from <zone name>         ←   one submenu per pickup zone you are inside (its full name)
        │     │     ├── Load <team name>        ←     teams that fit your remaining capacity
        │     │     └── ...
        │     ├── Extract: <group name>         ←   a single group is nearby
        │     │   or Extract from field         ←   2+ groups nearby → submenu with distances:
        │     │       ├── <group name> (25m)
        │     │       └── <group name> (87m)
        │     └── (greyed out if there is nothing to load or extract)
        ├── Check Cargo                         ← on the ground
        └── Parachute Troops                    ← airborne only, if your aircraft can air-drop
            or Parachute Troops (submenu)       ← if 2+ groups on board (+ "Parachute All")
Disembark Troops, Embark / Extract Troops and Check Cargo appear only while you are on the ground. Parachute Troops appears only while airborne (and only on aircraft configured for air-drops). If Embark / Extract Troops has nothing to offer — you are at capacity, no pickup zone is in reach, and no friendly group is within extract range — it is greyed out.
Loading troops
Land inside a pickup zone (TRZ_), then F10 → CTLD → Troop Commands → Embark / Extract
Troops → Load from <zone name>, and pick a team. Only teams that fit your aircraft's
remaining troop capacity (and that the zone still has in stock) are listed.
You must actually be inside the zone and on the ground, the zone must be active, and it must have troops left in stock — otherwise the load is refused with a message explaining why.
Disembarking troops
With troops on board, F10 → CTLD → Troop Commands → Disembark Troops. What happens depends on where you are:
| Where you are | What "Disembark Troops" does |
|---|---|
| Airborne | Button not shown — use Parachute Troops, or come to a low hover to fast-rope (see below) |
On the ground, inside an extract zone (EXZ_) |
Silent objective drop — the zone's counter is incremented, no group spawned |
On the ground, inside a pickup-only zone (TRZ_) |
Troops are returned to the zone's stock |
| On the ground, not in any zone | Combat drop — the group spawns around you |
On a plain combat drop the team spawns in a circle centred just off your aircraft, all facing
your heading, so nobody spawns under the rotors. If you drop inside a waypoint zone (WPZ_), the
team automatically marches to the zone centre with weapons free.
Fast-rope
You can drop troops without fully landing by coming to a low, slow hover:
- Fast-rope must be enabled by the mission (
enableFastRopeInsertion, on by default). - Height at or below roughly 60 ft AGL (
fastRopeMaximumHeight, ≈ 18.28 m). - Ground speed under about 8 km/h (2.2 m/s) — essentially a stable hover.
Meet those and Disembark Troops fast-ropes the team down; the confirmation reads "fast-roped ... into combat." If you are too high or too fast, the drop is refused with a message telling you to hover lower or land.
Extracting from the field
To recover a group that was dropped earlier, land within extract range (default 125 m,
maxExtractDistance) and use Embark / Extract Troops:
- One group nearby → a direct Extract: <group name> button, showing its current troop
count, e.g.
Extract: Bravo (7 troops). - Several nearby → an Extract from field submenu listing each group with its current troop
count and distance, e.g.
Bravo (7 troops, 25m).
The troop count reflects survivors, not the number originally deployed — casualties taken since drop-off are excluded. A group that lost every real trooper (only a mortar servant left standing) no longer appears here.
You must be on the ground, and you need enough spare capacity to take the group on board. The extracted team keeps its identity and any orders, so you can drop it again elsewhere.
Mission makers can also make pre-placed map groups extractable this way without a pickup zone — see Zone setup.
Parachuting troops
While airborne over the drop area, F10 → CTLD → Troop Commands → Parachute Troops air-drops the team by virtual parachute (available only on aircraft the mission has cleared for air-drops). See Parachute for the full drop mechanics.
Checking cargo
On the ground, F10 → CTLD → Troop Commands → Check Cargo reports what you are carrying — team name, troop count and weight, with a total line when several groups are on board.
Carrying several groups at once
You can load more than one team, as long as the combined troop count stays within your aircraft's capacity. Each group is tracked separately. Once you have two or more on board, the Disembark Troops and Parachute Troops entries turn into submenus:
- Disembark All / Parachute All — deploy every group in sequence.
- [1] <name>, [2] <name> — deploy one specific group.
JTAC teams
Some teams include a JTAC. When you disembark such a group, the JTAC automatically starts lasing targets; if you extract or return the group, its lasing stops. See JTAC for operating JTACs once they are on the ground.
See also
- Parachute — air-dropping troops and cargo
- JTAC — deploying and operating JTAC teams
- Zone setup — how pickup, extract and waypoint zones are defined
- Configuration — per-aircraft troop capacity and fast-rope settings